Embroidery Converter Studio Tutorials
Getting Started – Installing Embroidery Converter Studio
- Download the appropriate version for your operating system.
- Run the installer and follow the setup wizard.
- Launch the application once installation is complete.
- You’re ready to start!
Activating Your Pro License
- Purchase your Pro license from the upgrade page.
- Copy your license key from the email or checkout page.
- Open Embroidery Converter Studio.
- Click the “Upgrade to Pro” button in the main window.
- Paste your key and click “Activate”.
- All Pro features are now unlocked!
The application has 5 main tabs: Converter – Editor – Library – Design PDF – Export
Converter Tab:
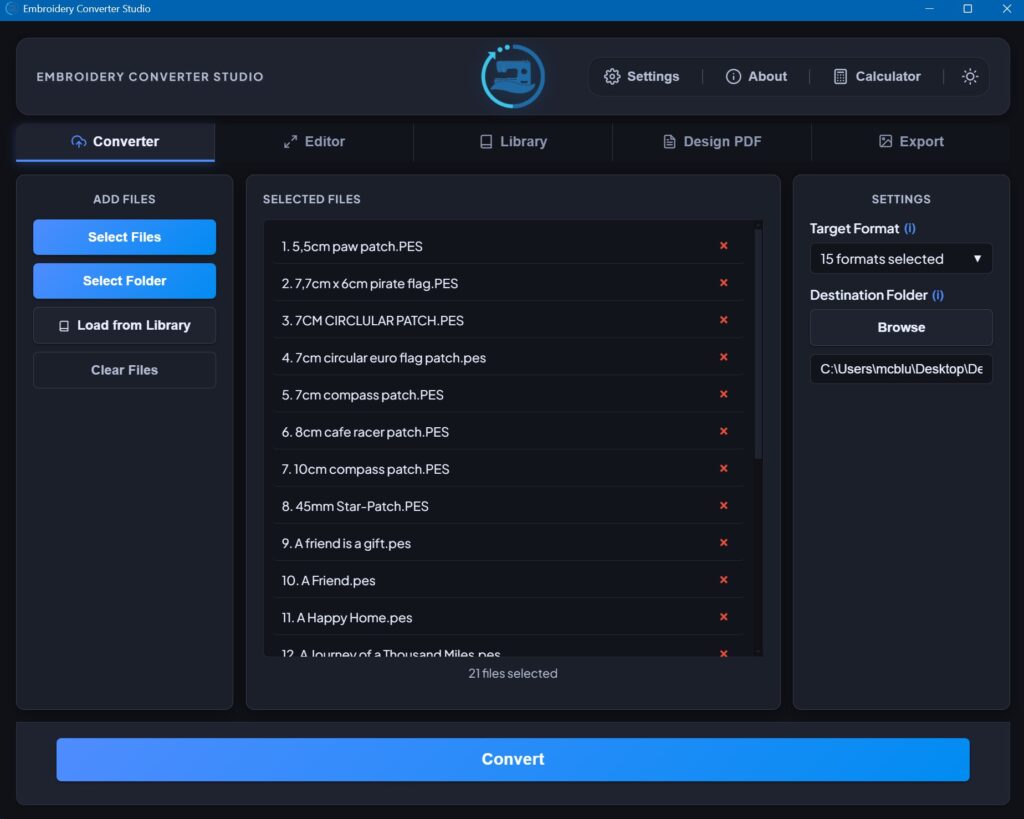
- Click on the Converter tab.
- Click “Select File” and choose your embroidery file (Pro users can import and convert entire folders).
- Choose your desired output format from the dropdown on the right side of the screen (Free users can only import one design at a time, and select one output format).
- Select your save location.
- Click the Blue convert button at the bottom of the screen.
- Progress will be displayed during the conversion.
- A pop-up with a folder link will appear when your converted file is ready.
Supported Format Combinations
- Input formats: 10O, BRO, DSB, DST, DSZ, EMD, EXP, HUS, INB, JEF, JPX, KSM, PCD, PCM, PCQ, PCS, PEC, PES, SEW, SHV, STX, TAP, U01, VP3, XXX.
- Output formats: 10O, DST, DSZ, EMD, EXP, GCODE, HUS, INB, JEF, PCS, PEC, PES, U01, VP3, XXX.
- All 26 input formats can be converted to any of the 15 output formats.
- The Pro version can easily handle any combination of 5000+ input designs, and can output (if selected) all 15 formats in one swoop!
- The converter will automatically skip any format conversions that already exist in the input folder.
- The speed of the conversion process is entirely dependent on the power of your computer.
Using Custom Naming Patterns
- Click the “Naming” tab to access custom naming options.
- Use variables like {filename}, {date}, {format} to create patterns.
- Example: “{filename}converted{format}” creates “design_converted_PES”.
- Preview your naming pattern before converting.
Editor Tab:
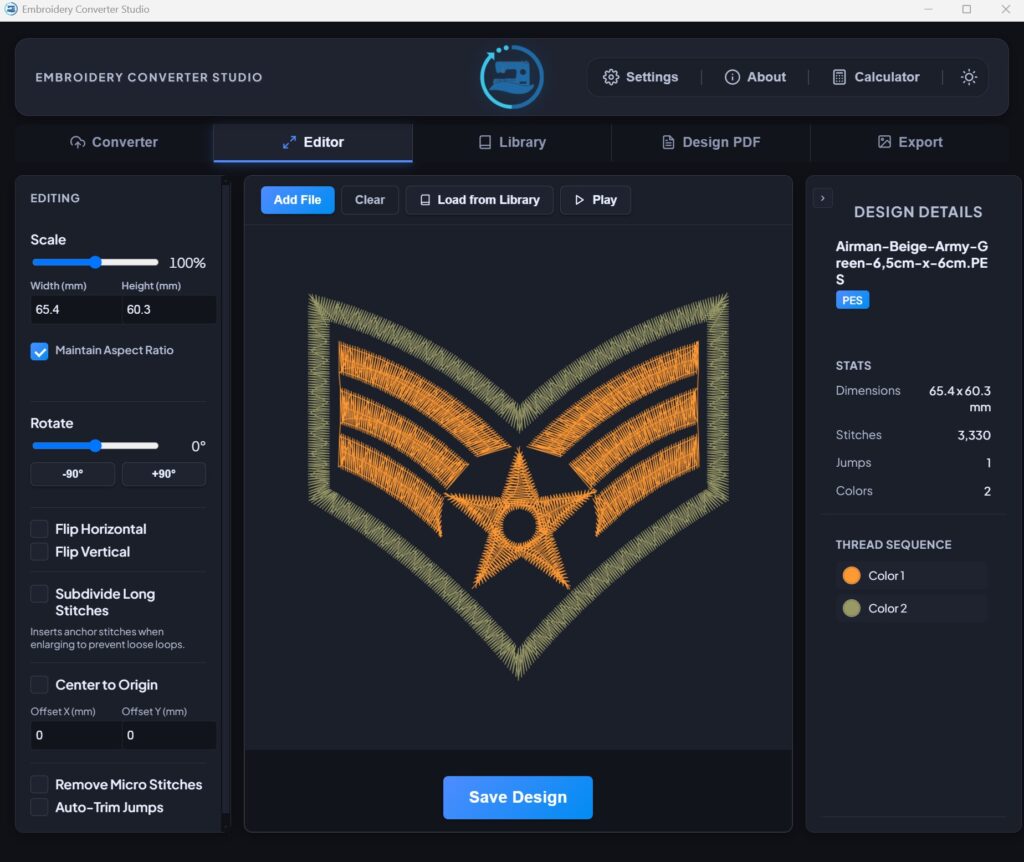
- Add an embroidery file directly from your computer (Add File button), or load from the built-in Library (Load from Library button).
- The design information is displayed on the right side panel. It will show: Format, Dimensions, Stitch Count, Jumps, Colours Count and Colour Info.
- Use the Scale Slider to enlarge or reduce the design size up to 25% from the original size (stitch density will also change).
- Check the Maintain Aspect Ratio box to lock the design Height & Width together, uncheck if you want to intentionally skew the design.
- Use the Rotate Slider to rotate the design size up to 180* from the original position. Move the slider all the way left, then double-click +90* to reset.
- Select ‘Flip Horizontal’ to Invert (mirror) the design from Left to Right.
- Select ‘Flip Vertical’ to Invert (mirror) the design from Top to Bottom.
- Select ‘Subdivide Long Stitches’ to fix issues that arise from resizing.
- If ‘Center To Origin’ is selected, the program will attempt to fix design alignment issues.
- Select ‘Remove Micro Stitches’ to reduce small stitches.
- Select ‘Auto-Trim Jumps’ to automatically fix jump stitches.
- Then use the ‘Save Design’ to save your work.
- You can also access the ‘Stitch Player’ in this tab.
- Use the ‘Clear’ button to remove the design and reset the Editor.
Stitch Player (no direct tab, but you can access it via the Editor & Library tabs).
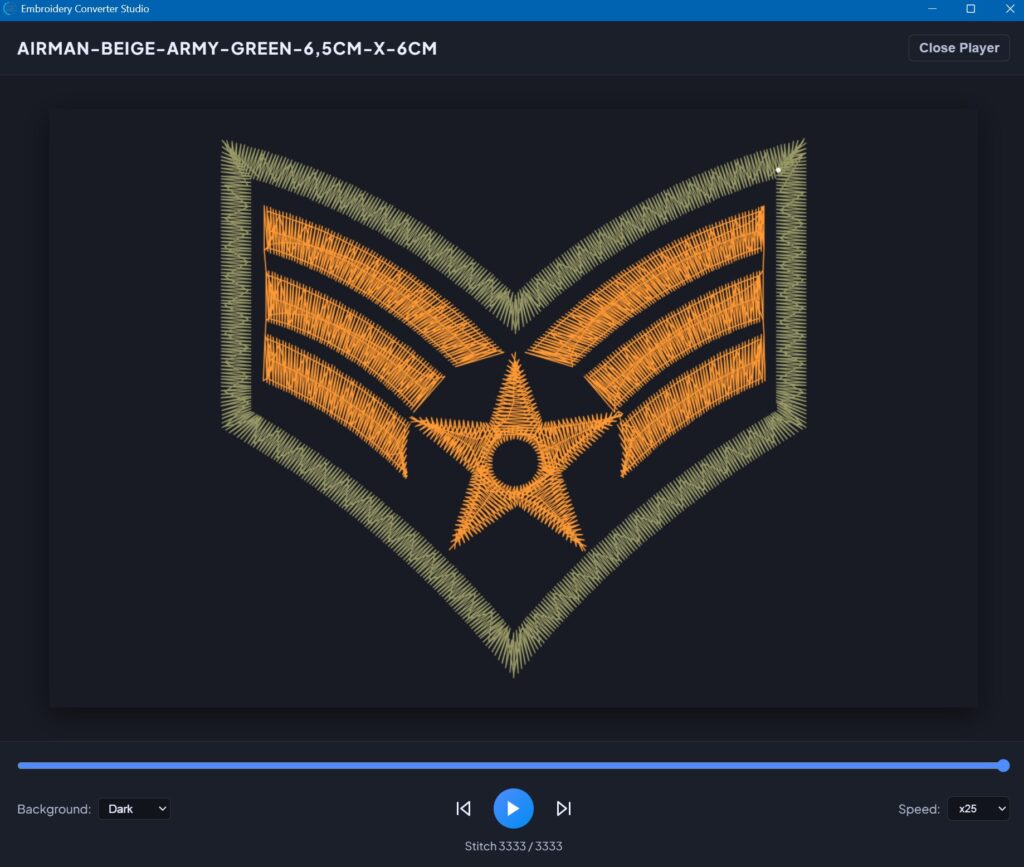
- The Stitch Player uses a simple ‘Stitch View’ mode.
- The ‘Background’ drop down menu allows you to set a Light, Dark, or Custom background colour.
- When you select ‘Custom Background’, a colour picker with optional RGB code input will appear, to help you view designs on custom background colours.
- Design playback speed settings are 0.25X, 0.5X, 1X, 2X, 5X, 10X, 25X, and 50X.
- It’s not easy viewing a white design on a white background, so change the background colour to improve visibility during playback.
Library Tab:
(You must first import designs from your computer or the ECS Library)
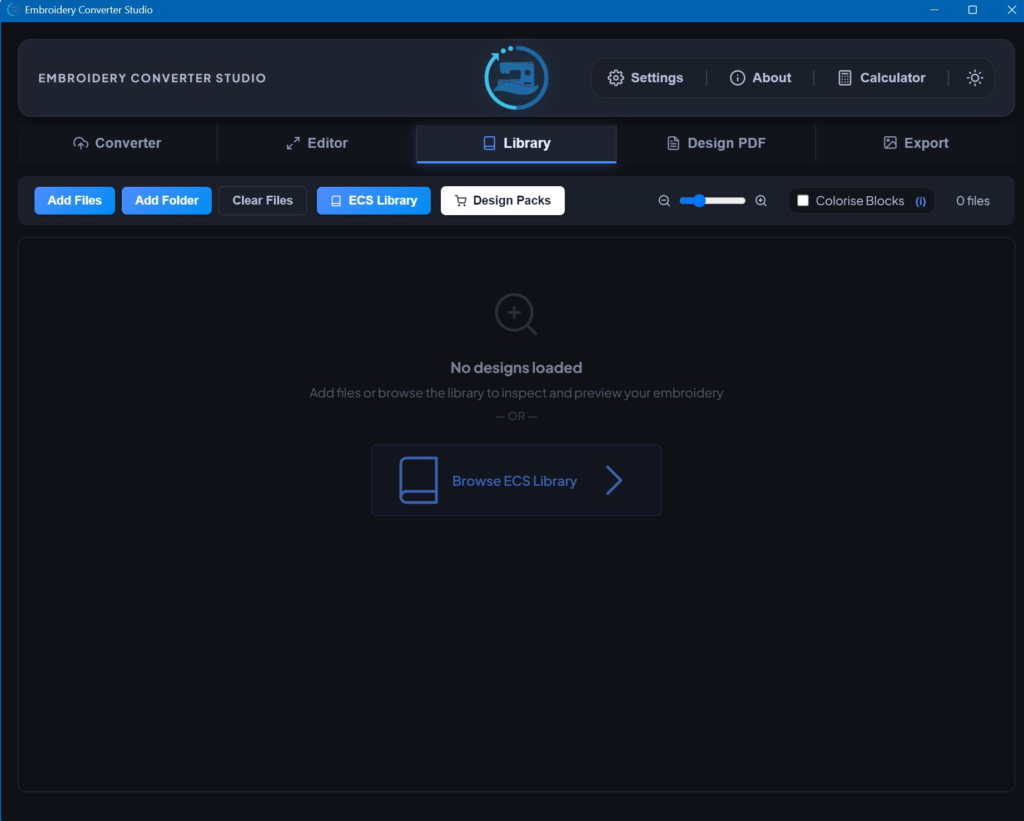
- Use the Add Files or Add Folder button to import designs into the Library.
- You can also just go directly into the ECS built-in library by clicking the ‘Browse ECS’ logo in the centre of the screen, or use the blue ‘ECS Library’ button provided.
- The white ‘Design Packs’ button is a link to the Design Product Catalog on this website, where we offer a range of embroidery design collections.
Library Folders:
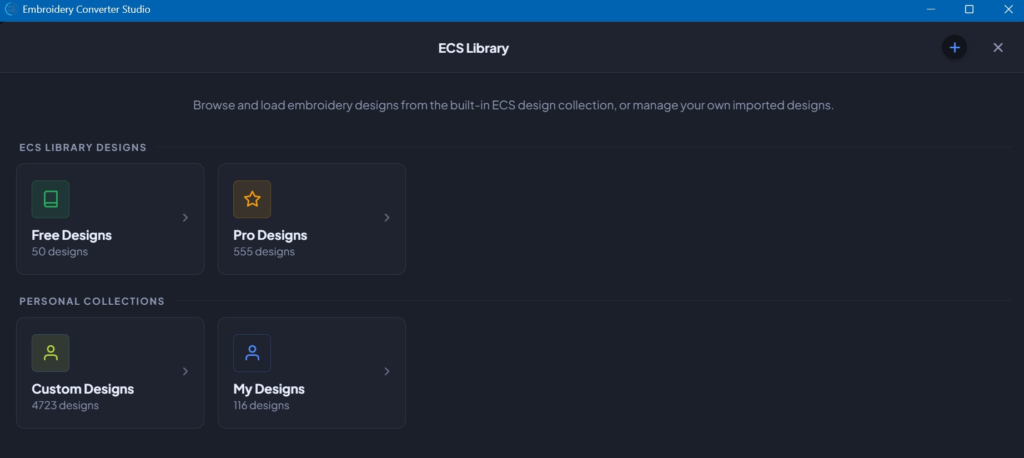
- All users can access the 50 designs in the Free folder, and any personal/custom folders you create.
- In addition to unlocking all the Pro features, the Pro license also unlocks the 500+ Designs in the Pro Folder (which includes a full set of 200+ World Flag Designs).
- You can store your personal designs in the ‘My Designs’ folder.
- You can create and name custom folders for your own use. Use the Blue + icon shown in the top right of the app screen to add new folders.
- You can access the contents of custom folder to add or remove designs by clicking the ‘Open Local Folder’ button.
Importing from the Free Designs Folder:
Select individual designs, or choose select all.
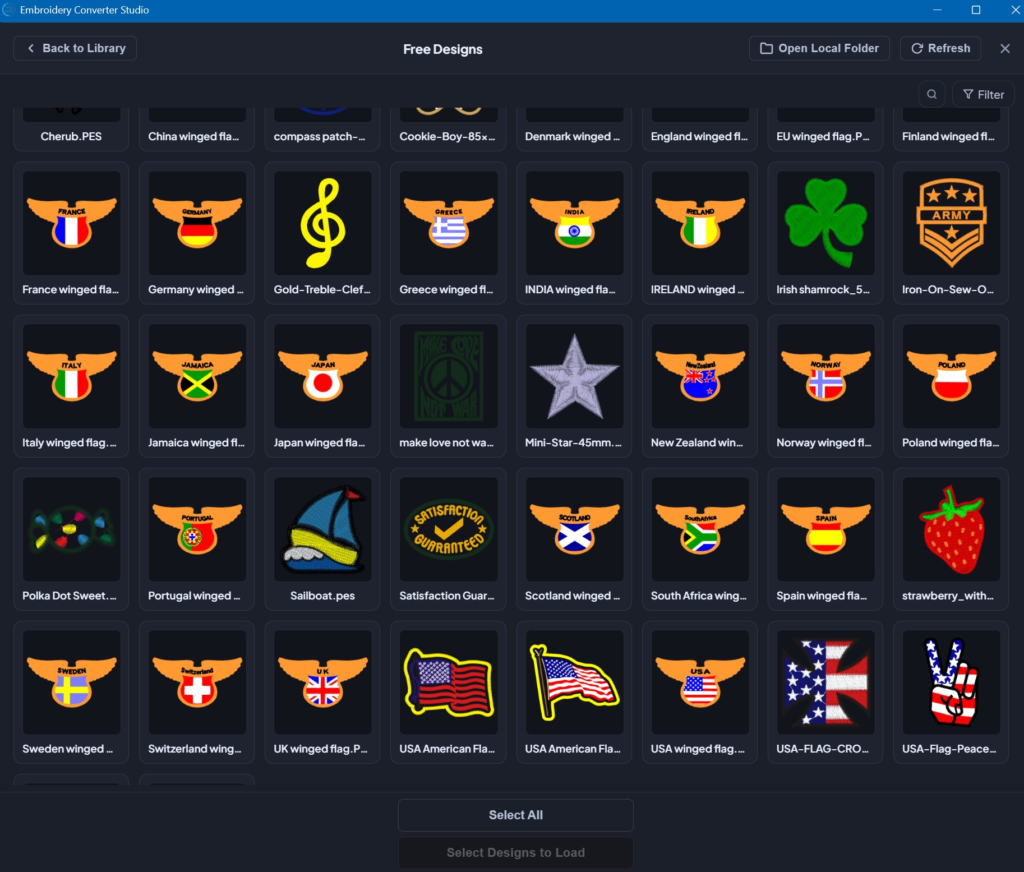
The chosen designs are now highlighted with blue ticks.
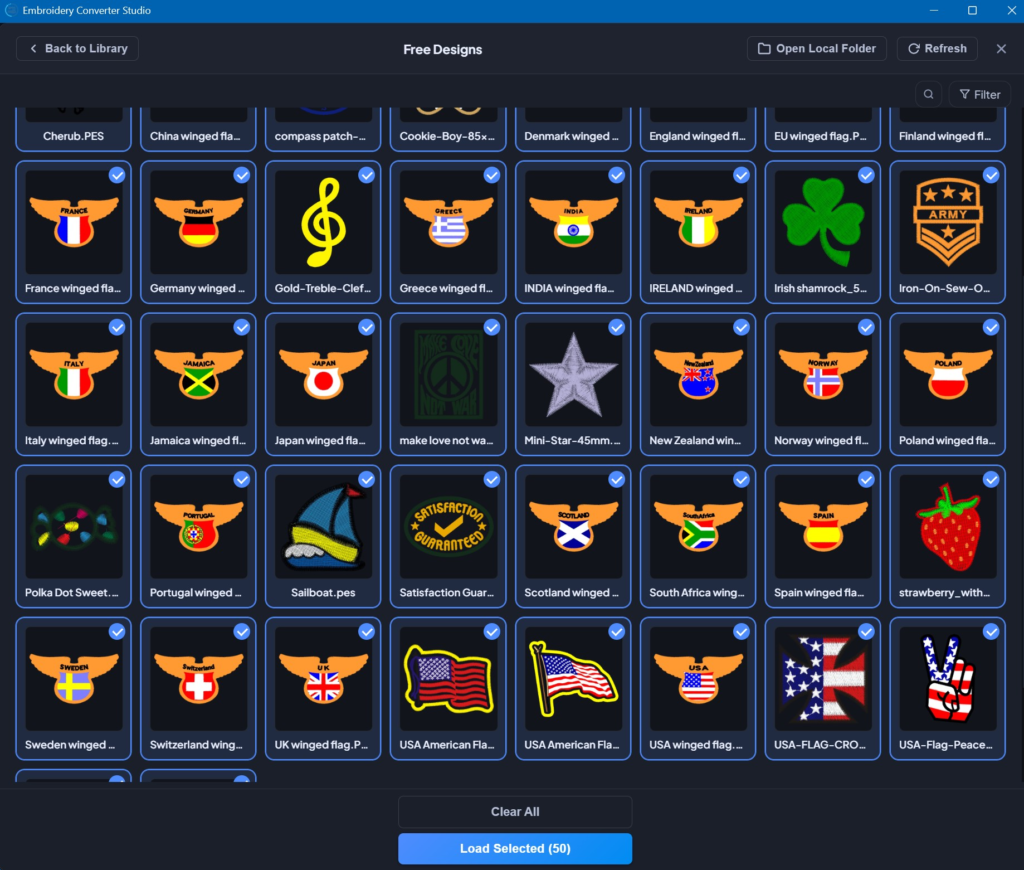
Click the blue ‘Load Selected’ Button to bring them into library view window.
Library View:
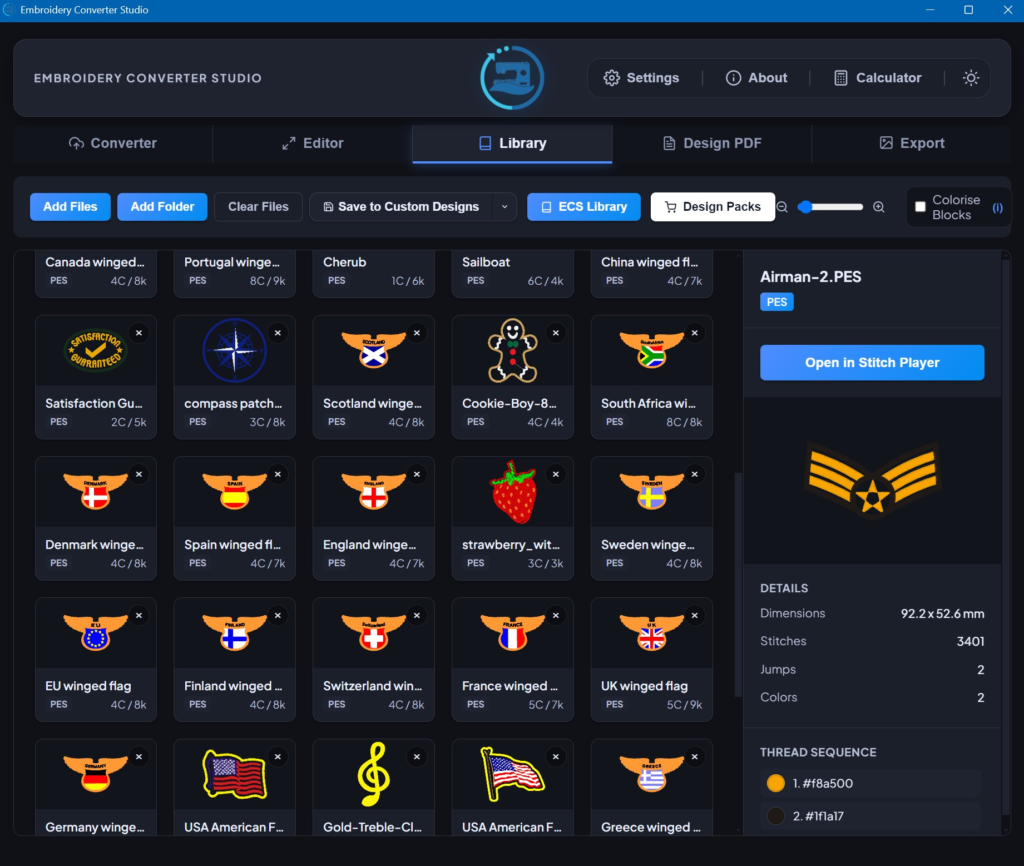
- Designs loaded into the library, can be saved to your personal or custom folders via the ‘Save To’ dropdown button.
- All of the folders you create are automatically added as options in the ‘Save To’ dropdown button.
- Saved designs can then be easily loaded into the other application tabs for Conversion, Editing, PDF printing or Image Extraction.
- Use the + or – slider to adjust the size of the design icons. This allows you to set how many previews are shown on the page.
- Embroidery formats like DST do not carry colour info. The ‘Colourize Blocks’ setting will assign random colours to help you view those designs.
- You can select any design from this screen in the app and open in stitch player.
Design PDF Tab:
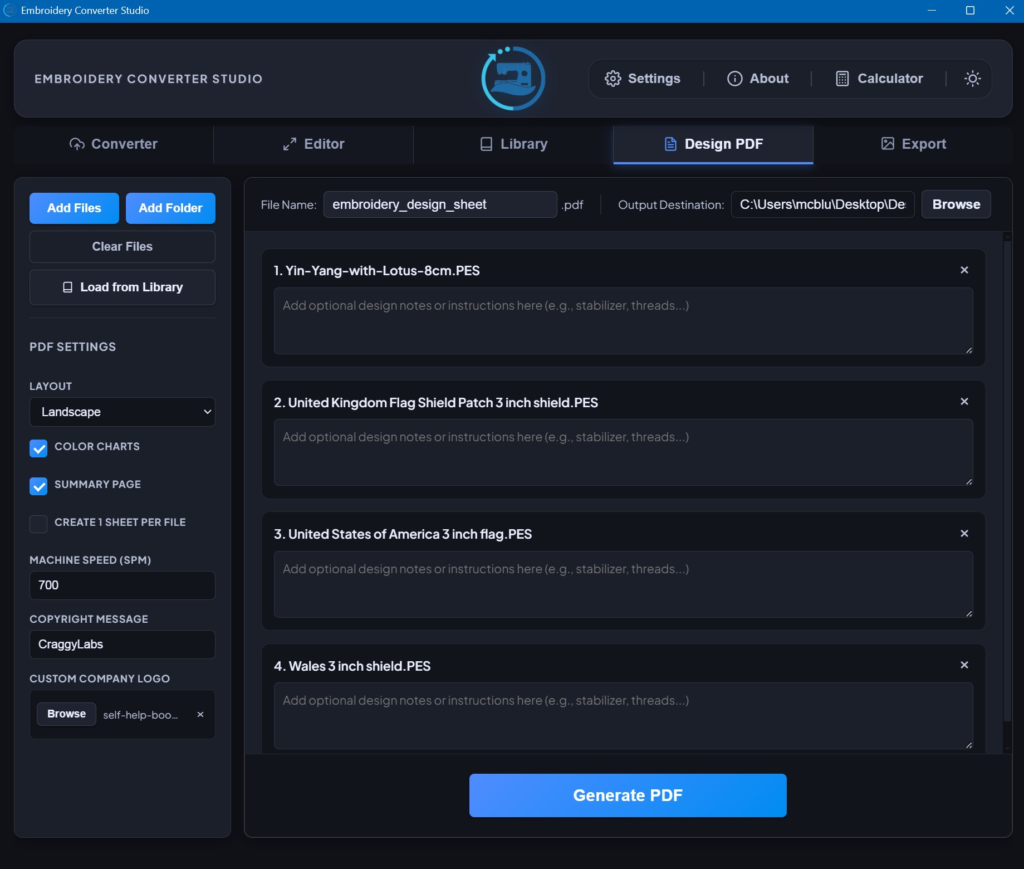
- This feature gives you the ability to print Design PDF’s, either individually or a full design catalog.
- Check the Color Charts box to include them in the PDF’s.
- Check the Summary Page box to include a summary in PDF’s containing multiple designs.
- Check the 1 Sheet Per File box to create individual PDF’s. The default (unchecked) will create a multiple design catalog.
- The ‘Machine Speed’ box allows you to set the embroidery machine speed used to calculate the stitch time shown in the PDF.
- The Copyright box allows you to include a copyright message in the PDF.
- The ‘Custom Logo’ setting allows you to add your own custom logo to all PDF’s generated.
- You can add optional custom design notes to individual design PDF’s.
- The ‘File Name’ box gives you the option to use a custom naming structure to generated PDF’s.
- The ‘Output Destination’ setting allows you to select a specific output folder on your computer.
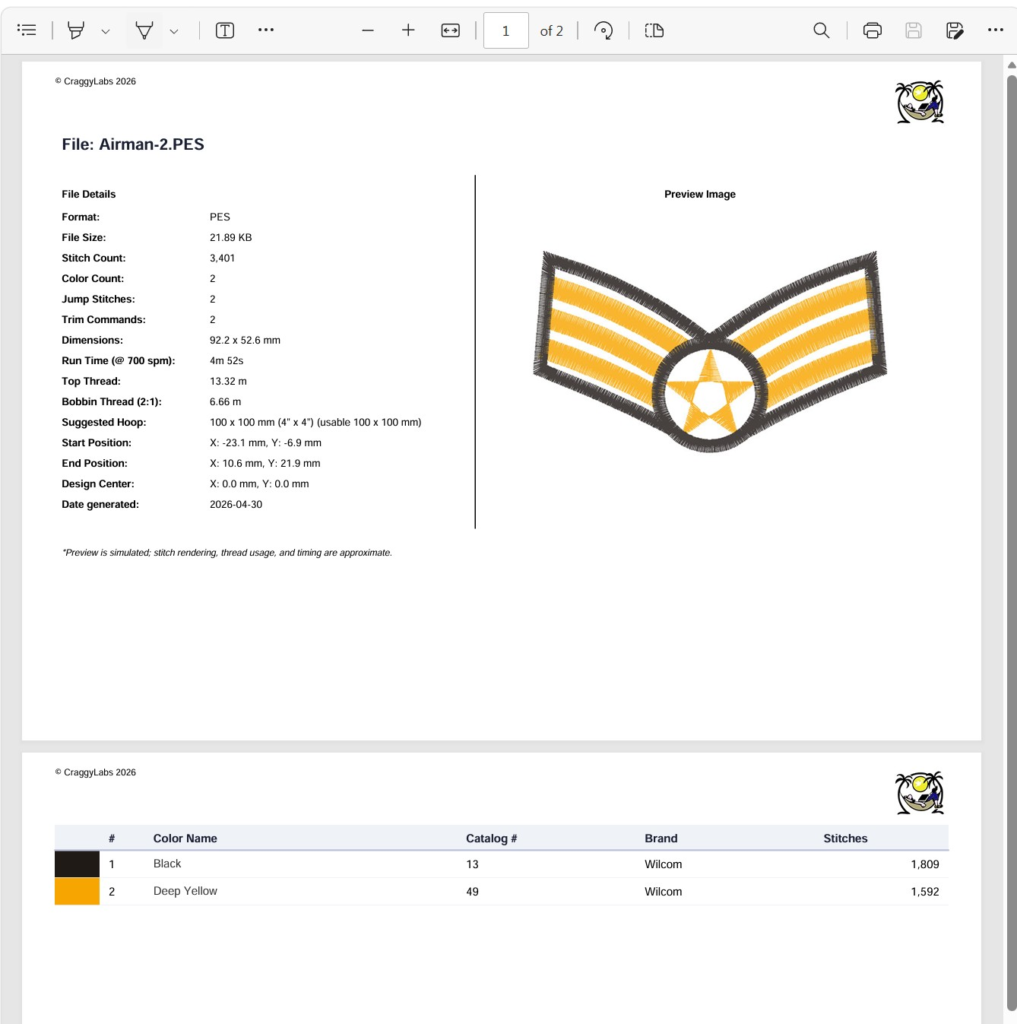
Design PDF Output
Below is an example of the PDF output generated from a simple embroidery design, with custom copyright text (top left), and custom logo (top right).
Export Tab:
The export functions are used specifically for extracting ‘Design Preview Images‘ from embroidery files.
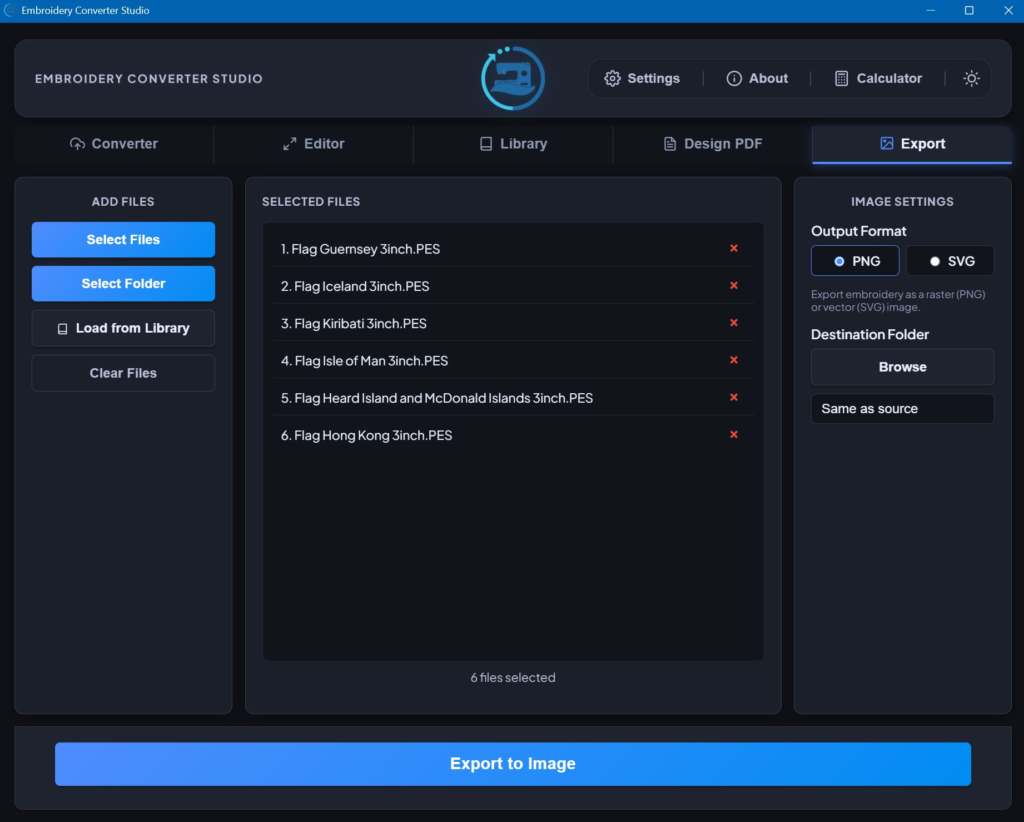
- Load your designs from the internal Library, or your computer.
- Choose an image output format (PNG or SVG).
- Set your Destination Folder.
- Click the Blue ‘Export to Image’ button and the images are automatically generated and saved to your chosen folder.
Stitch Time Calculator (Click the calculator icon at the top right of the app screen)

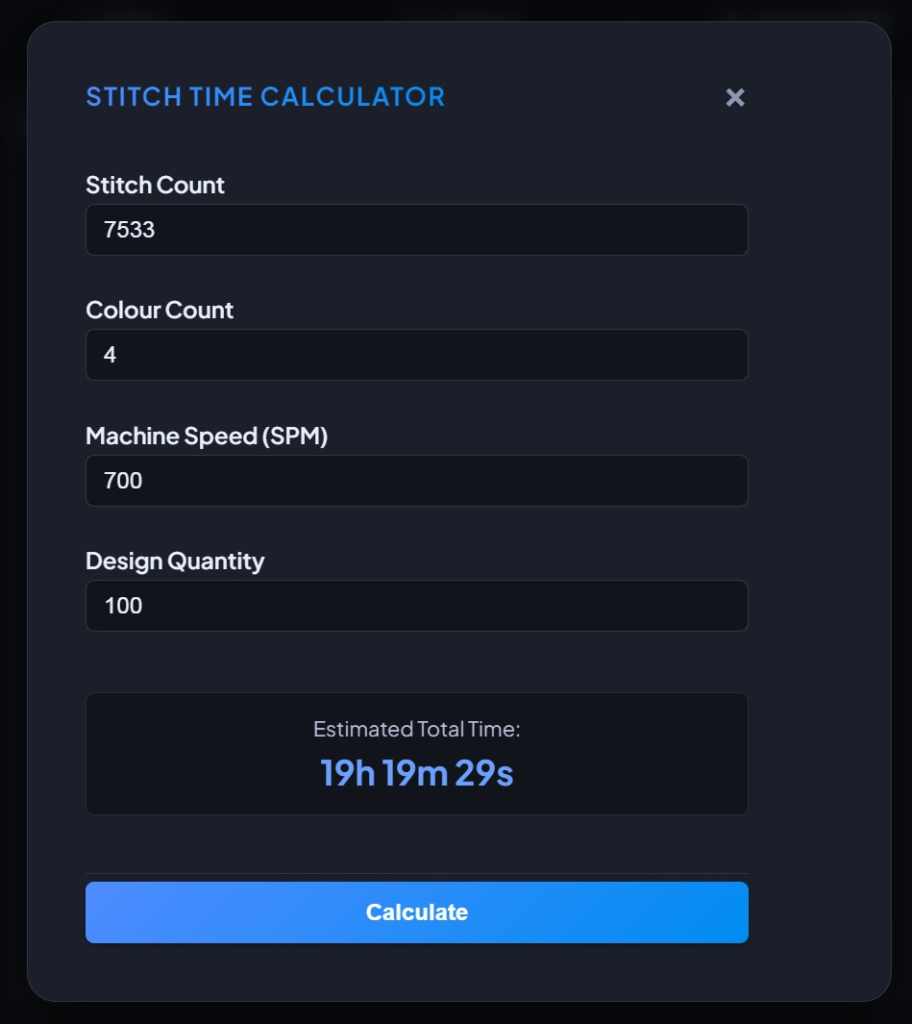
- Enter the stitch count of the design.
- Enter the amount of colour changes in the design.
- Enter the speed setting of the embroidery machine.
- Enter how many copies of the design you need the stitch out.
- Hit Calculate and the approximate project stitch time is automatically calculated for you.
- Time allowances for colour changes and embroidery speed ramping are hard-baked into the calculation.
System Settings:
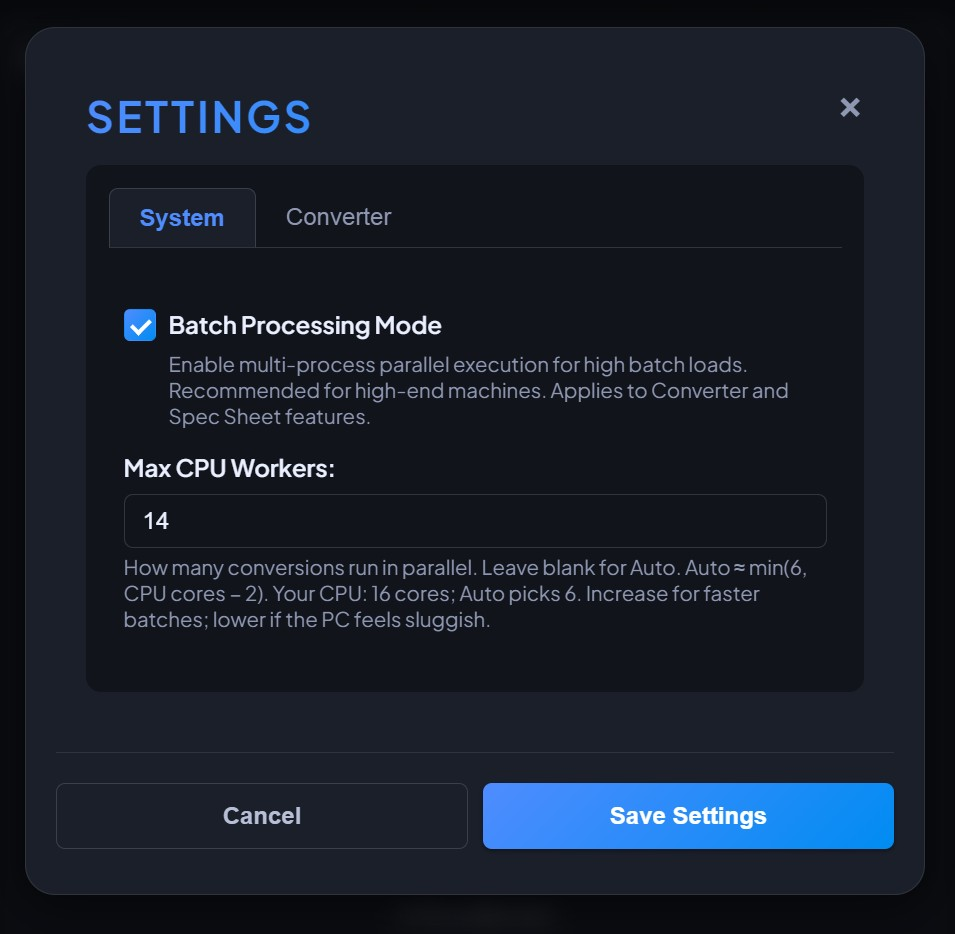
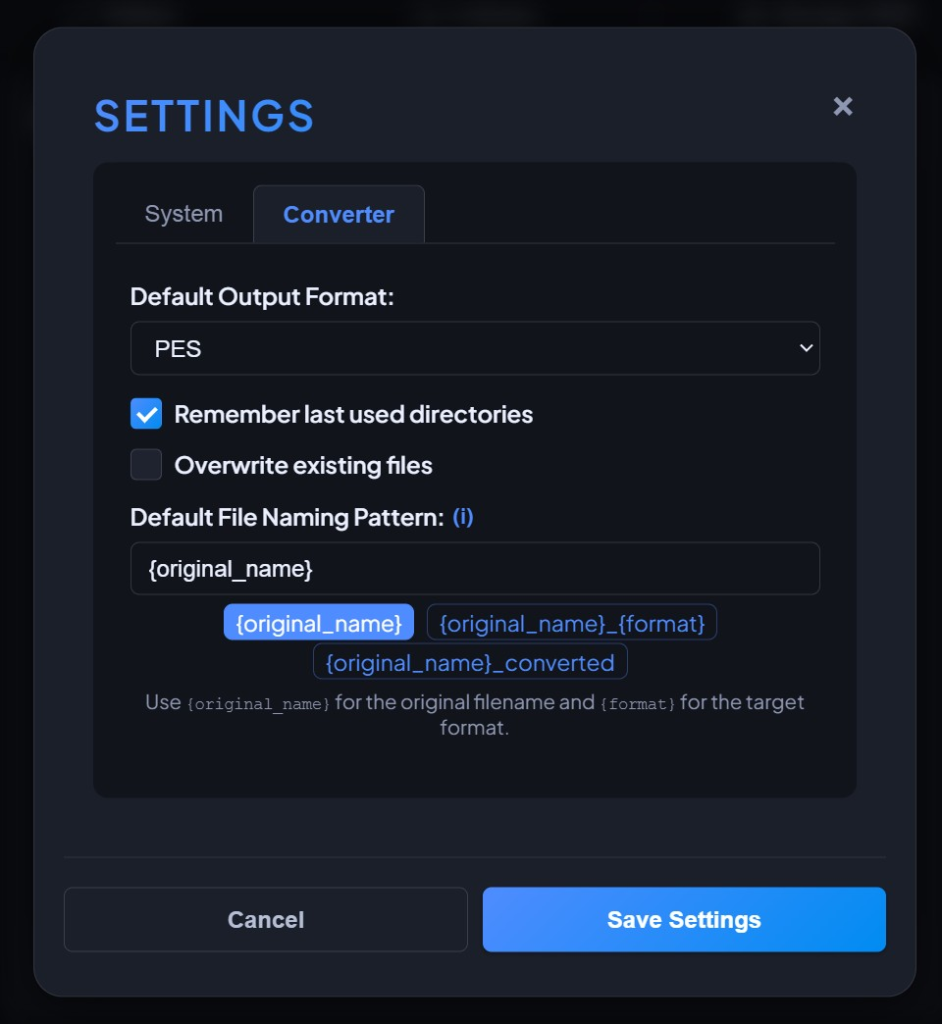
Converter Settings:
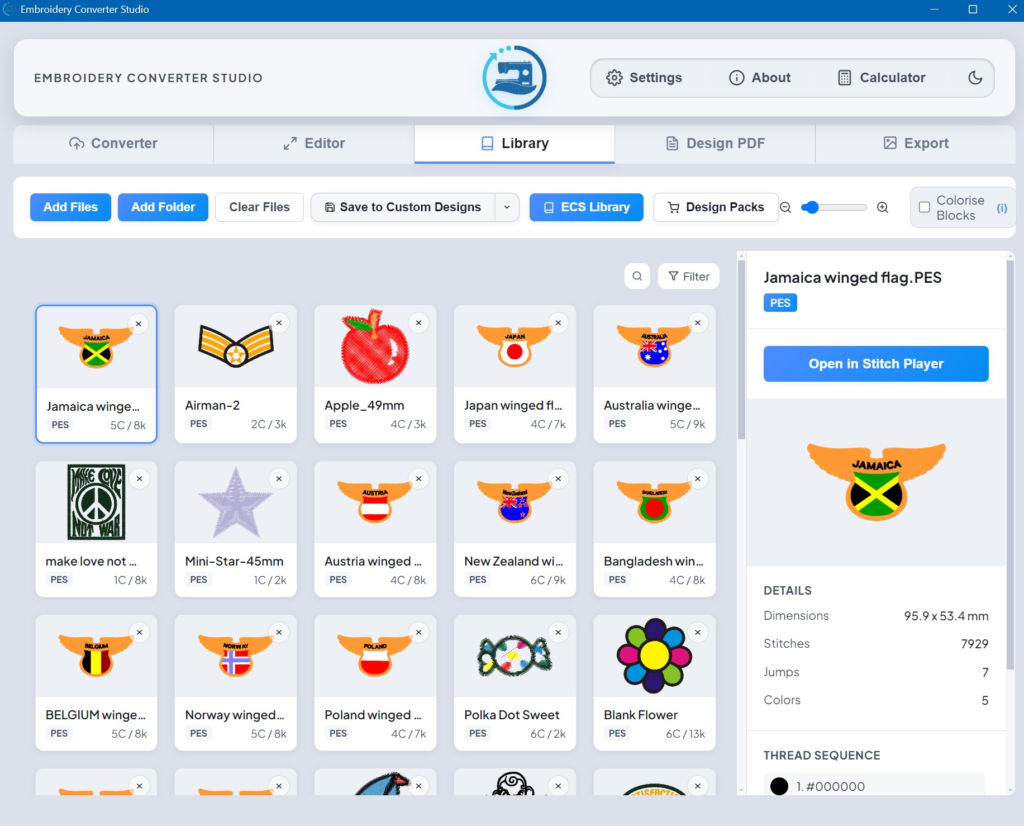
Light & Dark Modes (click the sun or moon icon to toggle between viewing modes)
The application in Light Mode.
Troubleshooting Common Issues
Extracting Designs From The Program
- There are 4 ways to do this.
- Load the designs into the converter, then convert & save to desktop.
- Load an individual design into the editor tab and click save.
- Click the Library tab, select the folder, then click the ‘Open Local Folder’ button. Then you can copy/paste designs from in there.
File Won’t Convert
- Verify the file isn’t corrupted by opening in original software.
- Check file permissions (especially on Mac).
- Ensure sufficient disk space for output files.
- Try converting a different file to test the software.
Slow Performance
- Close other applications to free up RAM.
- Process smaller batches of 500 to 1000 files.
- Ensure your output drive has sufficient free space.
- Consider upgrading system RAM for frequent processing of very large batches.
- Generating PDF documents for large batches of embroidery designs is a CPU intensive task. It will always take significantly longer than a typical bulk format conversion. On our test system (Ryzen 5600x with 32GB DDR4 Ram), our software consistently generated 120 PDF design charts per minute. On newer DDR5 computers with Intel Core Ultra, or Ryzen 9000, or a mac M4 chip, Format Conversions and PDF Generations are much faster.
- Some ‘budget laptops’ have very weak CPU capabilities, especially in ‘power saving’ mode. Try selecting ‘Performance Mode’ if your machine is sluggish.
Missing Design Elements
- Some format conversions may not preserve all design elements.
- Complex fills might convert differently between formats.
- Always test converted files with your embroidery software before production.
Advanced Tips
Organizing Your Workflow
- Create dedicated folders for input and output files.
- Use consistent naming patterns across projects.
- Keep backup copies of original files.
- Document your conversion settings for client projects.
Format Selection Guidelines
- Use DST for Tajima and most commercial machines.
- Choose PES for Brother home machines.
- Select JEF for Janome equipment.
Batch Processing Best Practices
- There is no need to pre-sort files by format before processing (provided they are on the supported input formats list).
- Test conversions on sample files first.
- Use meaningful output folder names.
Need help with something specific? Contact Support for assistance.